Category: Database
-
MsSql – For Json auto
For Json variations Index Syntax Description Example (Simplified) Results (Simplified) 1 FOR JSON PATH Formats the result as JSON with nesting SELECT name, surname FROM users FOR JSON PATH [{ “name”: “John”, “surname”: “Doe” }] 2 FOR JSON PATH, ROOT(‘name’) Adds a root element to JSON output SELECT name FROM users FOR JSON PATH, ROOT(‘users’)…
-
Text search in mass files – comparison
grep: Traditional command-line text search utility, widely available. sift: Modern, fast, supports complex searches with an intuitive interface. ack: Optimized for programmers, great for searching through codebases. ag (The Silver Searcher): Focused on speed and efficiency, especially in large codebases. ripgrep (rg): Extremely fast, respects .gitignore, offers powerful regex support. git grep: Tightly integrated with…
-
MongoDB VS ElasticSearch
Index Parameter Elasticsearch MongoDB Score for Elasticsearch Score for MongoDB 1 Type Search engine based on Lucene NoSQL document-oriented database 85 95 2 Data Model JSON-like documents BSON (binary JSON) documents 90 98 3 Query Language Query DSL based on JSON Rich query language 85 95 4 Indexing Inverted indexing for full-text search Secondary indexing…
-
Elastic search alternatives – search big data
Index Platform Name & Link Description Free/Paid Has API Advantages Disadvantages OS Grade 1 Python Versatile programming language Free No Wide-ranging libraries, flexible Requires programming knowledge Windows, macOS, Linux 95 2 Elasticsearch Distributed, RESTful search engine Both Yes Scalable, fast searching Complexity in setup Windows, macOS, Linux 90 3 Apache Solr Open-source search platform Free…
-
Useful links AI / ChatGPT / Certifications
AI Tools ChatGPT install ChatGPT to your PC הנה כמה תוספים שישפרו את השימוש שלכם באחד הכלים הכי פופולריים בעולם כרגע GitHub AI Collection Artificialintelligence Character.AI בינה מלאכותית שמאפשרת לכם לנהל שיחה עם מפורסמים מהעולם כולל אנשים מתים היא לומדת את הבן אדם ממידע שנמצא עליו ברשתות ויוצרת צ׳אט שמחקה את הצורה שבה הבן אדם…
-
How to create a linked server
Article that actually works: How to create a linked server mssql
-

ERD – Entity relations diagram
Click to Enlarge Right click to download full size Download Academic courses HERE.
-
Big Data / NoSql
MongoDB Tutorials Tutorial 1 (guru99) Terms Quick Reference show dbs – show all dababases show collections – show all collections in database. use [db name] – switch to the specific database. db.[collection].find() – find records in the collection. db.[collection].find({email:”[email protected]”}) – find specific value db.[collection].findOne() – find one record in the collection. db.[collection].findOne({email:”[email protected]”},{password:”12345″}) – find specific…
-
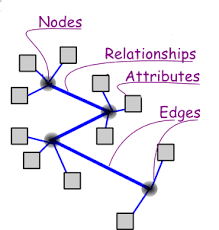
Graph database
In computing, a graph database is a database that uses graph structures for semantic queries with nodes, edges and properties to represent and store data. A key concept of the system is the graph (or edge or relationship), which directly relates data items in the store. This contrasts with conventional relational databases, where links between…
-

SQLite – References
Top 5 Sqlite management tools: http://www.ginktage.com/2013/08/5-popular-and-free-sqlite-management-tools/ http://sqliteadmin.orbmu2k.de/ Youtube Video tutorial: http://www.ginktage.com/2013/08/5-popular-and-free-sqlite-management-tools/
-

How to install PhpMyAdmin on C9.IO
here is a link of how to: https://docs.c9.io/docs/setting-up-phpmyadmin
-
How to setup PhpMyAdmin at your website
1. Download PhpMyAdmin. 2. Upload it to your Server/Domain. 3. Browse to www.your-domain.com/phpMyAdmin/Setup 4. Click on “New Server” button: 5. Under “Server hostname” write your host name. 6. Under “User for config auth” (might be under authentication tab) write MySql username. 7. Under “Password for config auth” write MySql password. 8. Under PhpMyAdmin top level…
-

SSMS / Visual Studio Sql server database project
Database good practice Tools to use: SSMS – sql server management studio Visual Studio The following video is the best to describe the process How To Create a Database Deployment Project in 10 minutes In short: Using VisualStudio connect to Database. Right click on the DB and select create new project. At this point there…
-
The Connection Strings Reference
The Connection Strings Reference ConnectionStrings.com help developers connect software to data. It’s a straight to the point reference with connection strings, a knowledge base of articles and database connectivity content and a host of Q & A forums where developers help each other in finding solutions. http://www.connectionstrings.com/
-
MS SQL Server Editions
MS SQL Server Editions Also include Express editions http://www.microsoft.com/en-us/server-cloud/products/sql-server-editions/sql-server-express.aspx
-
Step by step of executing SSIS 2012 package through stored procedure
Step by step of executing SSIS 2012 package through stored procedure http://blogs.msdn.com/b/biblog/archive/2013/05/07/step-by-step-of-executing-ssis-2012-package-through-stored-procedure.aspx
-
How to find Object ID by name at SQL Server
How to find Object ID by name at SQL Server Example of how to find ID of tables at database according to tables name: SELECT * FROM sys.columns WHERE object_id = Object_id(’employees’)
-
Multiplication Table – Stored Procedure
ALTER PROCEDURE [dbo].[Mulsp] @Size INT AS BEGIN DECLARE @X INT=2 DECLARE @Y INT=1 BEGIN try DROP TABLE [dbo].[multable] END try BEGIN catch END catch CREATE TABLE [dbo].[multable] ( c1 INT ) –create the rows DECLARE @CN NVARCHAR(max)=” DECLARE @TSql NVARCHAR(max) WHILE @x <= @Size BEGIN SELECT @cn = ‘c’ + Cast(@x AS NVARCHAR) PRINT @cn SET @TSql=‘alter table MulTable add ‘ + @cn + ‘ int’ PRINT @Tsql EXEC sys.Sp_sqlexec @Tsql SET @x=@x + 1 END –at this point build each line query SET @X=1 DECLARE @EachLineQuery NVARCHAR(max) WHILE @Y <= @Size BEGIN SET @EachLineQuery=‘insert into MulTable values (‘ WHILE @x < @Size BEGIN SET @EachLineQuery=@EachLineQuery + Cast(@x*@y AS NVARCHAR) + ‘,’ SET @x=@x + 1 END SET @EachLineQuery=@EachLineQuery + Cast(@x*@y AS NVARCHAR) + ‘)’ EXEC sys.Sp_sqlexec @EachLineQuery PRINT @EachLineQuery SET @EachLineQuery=” SET @y=@y + 1 SET @x=1 END SELECT * FROM multable END
-
Can’t browse SDF files in Visual Studio 2013
In Visual Studio 2013 you could double click a SDF database file within Solution Explorer and it would automatically open the database file and allow you to view the database tables, add tables, edit data etc. In Visual Studio 2013 this native support seems to have ‘fallen off’, double clicking an SDF file simply assumes it…