Category: Windows
-
Windows explorer works very slow
Problem: Upon Opening new directory Changing file name Creating new file Windows , Explorer reacts very slow Solution Original post Regedit Navigate to ComputerHKEY_CLASSES_ROOTDirectoryBackgroundshellexContextMenuHandlers Delete ContextMenuHandlers
-
How to install Windows or Linux from USB? 6 solutions
01 -ISO to USB A free and small software that can burn the ISO image file directly to the USB drives, these USB drives include USB flash drives, memory sticks and other USB storage devices, it also supports to create a bootable USB disk with Windows operating systems. Freeware. Works most of the times, grade:…
-

Install & Run Windows/WinPE on a USB drive!
WinToUSB is a free software that allows you to install and run Windows operating system on a USB hard drive or USB flash drive, using an ISO image or CD/DVD drive as the source of installation. In the newest version you can clone current Windows OS (Windows 7 or later) to a USB drive as…
-

Activate GOD Mode on windows 8
1. Right click on the desktop. 2. Create new folder. 3. Name the new folder: GodMode.{ED7BA470-8E54-465E-825C-99712043E01C} 4. The result:
-

NAPS2 (Not Another PDF Scanner 2)
NAPS2 is a document scanning application with a focus on simplicity and ease of use. Scan your documents from WIA- and TWAIN-compatible scanners, organize the pages as you like, and save them as PDF, TIFF, JPEG, PNG, and other file formats. Requires .NET Framework 4.0 or higher. NAPS2 is currently available in 17 different languages.…
-
How to create bootable windows on USB Flash disk (disk on key)
How to create bootable windows on USB disk on key 1. On windows 8, at the search bar of windows, search for windows to go: 2. Enter at the Search Bar: “Windows to go”. 3. Open “Windows to go” and follow the instruction there. 4. Note 1: You will have to use Windows 8 Enterprise…
-
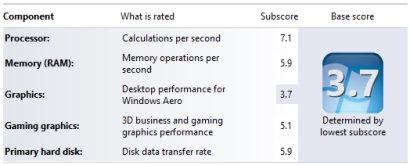
Experience Index scores in Windows
Method 01: 01 – Open command prompt – cmd. 02 – Enter: winsat prepop 03 – Wait till it finishes. 04 – Open PowerShell. 05 – Enter: Get-WmiObject -Class Win32_WinSAT 06 – Results: CPUScore is the score for the processors on the PC. D3DScore is the score for the 3D graphics capabilities of the PC.…
-
Freeing Disk Space on C: Windows Server 2008
Freeing Disk Space on C: Windows Server 2008 Deleting any files/folders from C:windowstemp and C:Users%UserName%AppDataLocalTemp Delete all EventViewer logs Save to another Disk if you want to keep them Remove any unused programs, e.g. Firefox Remove anything in C:inetpublogs Remove any file/folders C:WindowsSystem32LogFiles Remove any file/folders from C:Users%UserName%Downloads Remove any file/folders able to be removed…
-
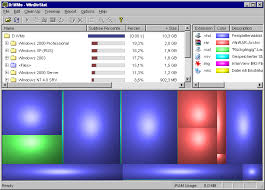
Windows Directory Statistics
WinDirStat is a disk usage statistics viewer and cleanup tool for various versions of Microsoft Windows. Note: if you are looking for an alternative for Linux, you are looking for KDirStat (apt-get install kdirstat on Debian-derivatives) and for MacOS X it would be Disk Inventory X or GrandPerspective. Please visit the WinDirStat blog for more…
-
Windows Installer Folder – Is it safe to delete
Windows Installer Folder – Is it safe to delete Over time this folder can grow to over a Gigabyte or more in size. Some laptops that may only be a few years old could have relatively small hard drives and free drive space is at a premium. Here is a relatively simple solution to the…
-
Enable Hyper-V on Windows 8
Enable Hyper-V on Windows 8 Note 1: it will work on windows 8 enterprise / Pro / Ultimate and etc. Note 2: You need to enable Hyper-V on bios. Step 1: Open Control Panel and select Program and Features: Step 2: Click on “Turn Windows features on or off”: Step 3: Check “Hyper-V”:…
-
Howto switch from Windows Server 2012 Standard Server to Windows Server 2012 Datacenter Server without having to reinstall
open an administrative power shell session and pop your new key in using the dism tool dism /online /set-edition:ServerDatacenter /productkey:<Datacenter key, e.g. AAAAA-BBBBB-CCCCC-DDDDD-EEEEE> /AcceptEula http://community.spiceworks.com/how_to/show/30293-howto-switch-from-windows-server-2012-standard-server-to-windows-server-2012-datacenter-server-without-having-to-reinstall
-
HOW TO AUTO LOGIN WINDOWS
To use Registry Editor (Regedt32.exe) to turn on automatic logon, follow these steps: Click Start, and then click Run. In the Open box, type Regedt32.exe, and then press ENTER. Locate the following subkey in the registry: HKEY_LOCAL_MACHINESOFTWAREMicrosoftWindows NTCurrentVersionWinlogon Double-click the DefaultUserName entry, type your user name, and then click OK. Double-click the DefaultPassword entry, type your password, and then click OK.NOTE: If the DefaultPasswordvalue does not…
-
HOW TO DISABLE PASSWORD EXPIRY AND COMPLEXITY REQUIREMENTS IN WINDOWS 2008
HOW TO DISABLE PASSWORD EXPIRY AND COMPLEXITY REQUIREMENTS IN WINDOWS 2008 1) Load Group Policy Editor ( Start –> Run –> gpedit.msc ) 2) Expand sections as follows: Computer Configuration –> Windows Settings –> Security Settings –> Account Policies –> Password Policy Set ‘Maximum password age’ to 0 to totally disable expiry. Password Complexity Requirements…
