Category Archives: Plugins
WordPress – Crud (Create / Read/ Update / Delete) methodologies
Centralized post for WordPress development
Gitium – Plugin that pushes changes from wordpress to Git repo
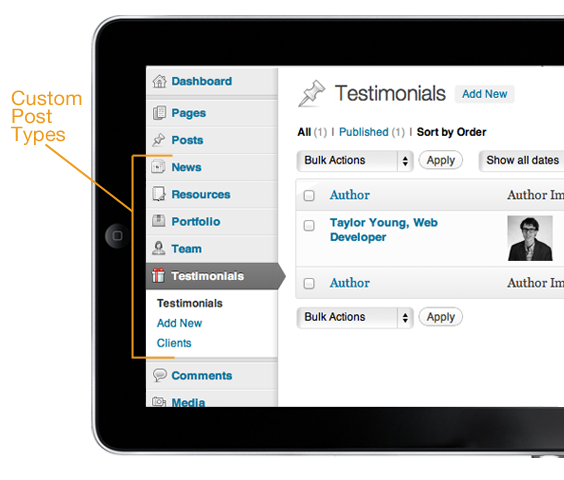
How to create post types with specific fields
WordPress / Git / Bitbucket
Elementor – Page Builder For WordPress
How to limit post and post-types viewing and editing to post creator only

Read the following post in order to be able to limit editing and viewing post or post-types to post creator only:
02. This is the plugin:
<?php
/*
Plugin Name: Simplify Post Edit List
Description: Show only the author's posts in the edit list
Version: 0.1
License: GPL
Author: Sarah Gooding
Author URI: http://untame.net
*/
function mypo_parse_query_useronly( $wp_query ) {
if ( strpos( $_SERVER[ 'REQUEST_URI' ], '/wp-admin/edit.php' ) !== false ) {
if ( !current_user_can( 'update_core' ) ) {
global $current_user;
$wp_query->set( 'author', $current_user->id );
}
}
}
add_filter('parse_query', 'mypo_parse_query_useronly' );
03. The line in red can be modified as follows:
a. Limit to Edit: strpos( $_SERVER[ 'REQUEST_URI' ], '/wp-admin/edit.php' ) !== false b. Limit to All admin area: strpos( $_SERVER[ 'REQUEST_URI' ], '/wp-admin' ) !== false c. Limit to All admin area: strpos( $_SERVER[ 'REQUEST_URI' ], '/[Post-Type here]' ) !== false d. Combination of IF: if ( strpos( $_SERVER[ 'REQUEST_URI' ], '/wp-admin' ) !== false || strpos( $_SERVER[ 'REQUEST_URI' ], '/wp-admin/edit.php' ) !== false || strpos( $_SERVER[ 'REQUEST_URI' ], '/[post-type]' ) !== false )
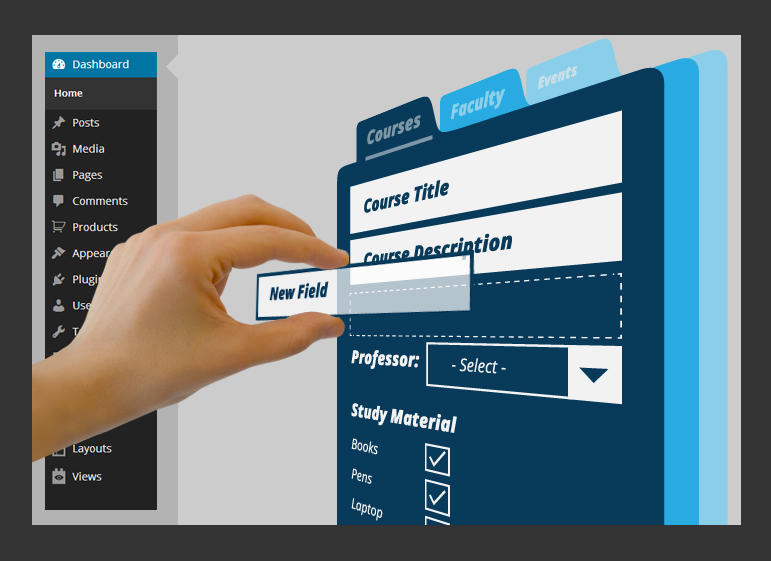
Create Post types and content templates with Toolset of WPML

Link to User Guides, Link to Videos
- Post Types
- Post Fields (p2.6). Under post fields->Edit the Post field->Under “Where to include those fields” assign to appropriate post types.
- Content Templates (includes video)
- Views (includes video)
- Archive for custom post type (includes video)
- Building a Custom Parametric Search with Views
- Post Form
- Access Control
ACF – Advance custom fields – How to design a Form
20 Best WordPress Plugins for 2016
My first WordPress Plugin – using shortcodes – in 6 steps

In general you can browse to wordpress developer resources.
1. Create a directory under your wordpress root\wp-content\plugins\ShortcodeDemo.
2. Create file called ShortcodeDemo.php.
3. Paste to ShortcodeDemo.php the following content:
<?php
/*
Plugin Name: Shortcode demo
Plugin URI:
Description: Shortcode Demo
Version: 1.0
Author: Gabriel Magen
Author URI: http://www.flash-jet.com
License: GPLv2
*/
add_shortcode( ‘fj’, ‘ch2ts_twitter_feed_shortcode’ );
function ch2ts_twitter_feed_shortcode( $atts ) {
$output = ‘<a href=”http://www.flash-jet.com”>
Flash-Jet</a>’;
return $output;
}
?>
4. Goto wordpress plugins and activate Shortcode demo plugin.
5. Create a post and write there [fj].
6. View the post at wordpress frontend and see the effect.
#1 Drag & Drop Page Builder Plugin for WordPress 500,000+ People Can Not Be Wrong…

Visual Composer page builder plugin for WordPress – take full control over your site. Build any layout you can imagine with intuitive drag and drop editor – no programming knowledge required.
http://codecanyon.net/item/visual-composer-page-builder-for-wordpress/242431
WHY VISUAL COMPOSER IS THE BEST PAGE BUILDER FOR WORDPRESS?
Visual Composer features huge set of amazing premium plugin options like drag and drop interface, backend and frontend editors, exclusive add-ons built with our API, template manager, powerful grid builder and more.
Thanks to these unique features, you can manage your WordPress site content easily without spending hours and hours to keep your site up to date. Moreover – now you can build your own WordPress site without coding and getting into shortcodes which is a truly unique experience you have been waiting for. Thanks to regular updates of Visual Composer the amount of premium class features is growing making Visual Composer an ultimate must-have tool for any WordPress site owner, designer or developer. Discover capabilities behind Visual Composer – drag and drop page builder.
Tutorial: Develop Plug-in that displays list of Posts under Admin-Settings in 8 Steps

General: Here a plugin that will display a list of posts will be demonstrated.
Read more about developer resources here: https://developer.wordpress.org/
Step 01: Plugin name will be DisplayListOfPosts
Step 02: Create a directory under wordpress-root\wp-content\plugins\DisplayListOfPosts
Step 03: Create a file under that directory called: DisplayListOfPosts.php
Step 04: The the following content to the plugin file:
<?php
/*
Plugin Name: Display List of Posts
Plugin URI: http://www.flash-jet.com
Description: A plugin demo that will display list of Posts
Version: 1.0
Author: Gabriel Magen
Author URI: http://www.flash-jet.com
*/
?>
Step 05: From wordpress admin panel, activate the new plugin.
Step 06: Here an action of adding option to admin menu will be demonstrated. Add the following code to file:
//adding action to admin menu and bind it to function name
add_action(‘admin_menu’,’DisplayListOfPosts_admin_actions’);
function DisplayListOfPosts_admin_actions() {
add_options_page(‘Display List Of Posts’,’Display List Of Posts’,’manage_options’,__FILE__,’DisplayListOfPosts_admin’);
//add_options_page(HTML Page title,Settings Submenu,hook only admin can see,php constant,function that will display the posts list);
}
function DisplayListOfPosts_admin() {
}
Step 07: Replace function DisplayListOfPosts_admin() with the following::
function DisplayListOfPosts_admin() {
global $wpdb; //wpdb wordpress database class
$mytestdata=$wpdb->get_results(“select ID,post_title from $wpdb->posts”); //get a query into wpdb class
echo “<br>Display list of posts:<br>”;
echo “<table border=1>”;//display the results as a table
foreach ($mytestdata as $singleraw) //loop inside the query
{
echo “<tr>”;
echo “<td>”.$singleraw->post_title.”</td>”;
echo “<td>”.$singleraw->ID.”</td>”;
echo “</tr>”;
}
echo “</table>”;
}
Step 08: Final code:
<?php
/*
Plugin Name: Display List of Posts
Plugin URI: http://www.flash-jet.com
Description: A plugin demo that will display list of Posts
Version: 1.0
Author: Gabriel Magen
Author URI: http://www.flash-jet.com
*/
add_action(‘admin_menu’,’DisplayListOfPosts_admin_actions’);
function DisplayListOfPosts_admin_actions() {
add_options_page(‘Display List of Posts’,’Display List of Posts’,’manage_options’,__FILE__,’DisplayListOfPosts_admin’);
}
function DisplayListOfPosts_admin() {
global $wpdb;
$mytestdata=$wpdb->get_results(“select ID,post_title from $wpdb->posts”);
echo “<br>Display list of posts:<br>”;
echo “<table border=1>”;
foreach ($mytestdata as $singleraw)
{
echo “<tr>”;
echo “<td>”.$singleraw->post_title.”</td>”;
echo “<td>”.$singleraw->ID.”</td>”;
echo “</tr>”;
}
echo “</table>”;
}
?>
Based on:
Tutorial: Develop WordPress Plug-in in 6 Steps – Add filter method

Here I will demonstrate how to build a wordpress plugin that will add prefix and suffix to each post content.
Step 01:
The name of the plugin that will be created here will be called PreSuff (Prefix / Suffix).
Create a directory for plugin under wordpress-root\wp_content\plugins. The directory name will be presuff.
So under wordpress root directory We will have: \wp_content\plugins\presuff.
Step 02:
Create a file called presuff.php. the content of the file will be:
<?php
/*
Plugin Name: PreSuff plugin
Plugin URI: http://www.flash-jet.com
Description: A plugin demo that adds prefix and suffix to post content.
Version: 1.0
Author: Gabriel Magen
Author URI: http://www.flash-jet.com
*/
?>
Step 03:
Add a filter:
add_filter(‘the_content’, ‘presuff’);
Step 04:
Add a function:
function presuff($content) {
$prefix= <<<PRE
<h3><center>Prefix to add to post<hr>
PRE;
$suffix= <<<SUFF
<h3><center>Suffix to add to post
SUFF;
return $prefix.$content.$suffix;
}
Step 05:
The whole file will look like the following:
<?php
/*
Plugin Name: PreSuff plugin
Plugin URI: http://www.flash-jet.com
Description: A plugin demo that adds prefix and suffix to post content.
Version: 1.0
Author: Gabriel Magen
Author URI: http://www.flash-jet.com
*/
add_filter(‘the_content’, ‘presuff’);
function presuff($content) {
$prefix= <<<PRE
<h3><center>Prefix to add to post<hr>
PRE;
$suffix= <<<SUFF
<h3><center>Suffix to add to post
SUFF;
return $prefix.$content.$suffix;
}
?>
Step 06:
- Activate the plugin.
- Create a Post.
- Result: the post include HTML content you wrote under $prefix and $suffix.
WordPress plugin development OOP way

let’s create WordPress plugin the easy way:
01. Create plug-in template as follows:
- Browse to http://wppb.me/ and generate plugin, this is Wordpress boilerplate generator and generates OOP plugin.
- Download the generated plug-in.
- Install it.
- In general here is a link to wordpress developer resources.
02. plugin code
- Search plugin directory for string “public static function activate()“.
- activation: in the activation phase we will install and create the wp_db table
- find the “public static function activate()” and add code to create the db table
-
public static function activate() { /**Create an instance of the database class**/ if (!isset($wpdb)) $wpdb = $GLOBALS['wpdb']; /**Set the custom table **/$table_name = $wpdb->prefix . "crud_links"; $demo_browser_db_version = '1.0'; /**Execute the sql statement to create or update the custom table**/ if ( $wpdb->get_var("show tables like '$table_name'" ) != $table_name ) { $sql = "CREATE TABLE " . $table_name . " ( ID int(11) NOT NULL AUTO_INCREMENT, Name varchar(255) DEFAULT NULL, Link varchar(255) DEFAULT NULL, LinkOrder int(11) NOT NULL, Description varchar(2255) DEFAULT NULL, OpenWindow tinyint(1) NOT NULL, PRIMARY KEY (ID) ) ENGINE=MyISAM DEFAULT CHARSET=utf8 AUTO_INCREMENT=5 ;"; require_once(ABSPATH . 'wp-admin/includes/upgrade.php'); dbDelta($sql); add_option( "my_plugin_db_version", '1.0' ); } }
- uninstall.php – when we remove the plugin this code will run
-
if ( ! defined( 'WP_UNINSTALL_PLUGIN' ) ) { exit;global $wpdb; $table_name = $wpdb->prefix . "crud_links"; $sql = "DROP TABLE IF EXISTS $table_name;"; $wpdb->query($sql); delete_option("my_plugin_db_version"); }
- wp hooks – admin menu
- Search plug-in directory for string private function define_admin_hooks().
- Add to this function the following line of code:
$this->loader->add_action( ‘admin_menu’, $plugin_admin, ‘admin_menu’ );
- this will call the function in admin folder
- Add the following code to php file under admin directory, not the index.php file, this will create admin page:
public function admin_menu() { add_menu_page("CRUD Operation", "Links Crud", 1, "admin_linkesmenu", array($this,"admin_links_display")); }
function admin_links_display() { include('partials/general-links-admin-display.php'); }
- Php file under Directory Admin\Partials, general-links-admin-display.php, Insert all html + php code and CRUD action you need for back-end.
<? php /** * Provide a dashboard view for the plugin * * This file is used to markup the public-facing aspects of the plugin. * * @link: http://www.flash-jet.com * @since 1.0.0 * * @package General_Links * @subpackage General_Links/admin/partials */ ?> <!-- This file should primarily consist of HTML with a little bit of PHP. --> <?php global $wpdb; /**Set the custom table **/ $table_name = $wpdb->prefix . "crud"; $CN =mysql_connect(DB_HOST,DB_USER,DB_PASSWORD) or die("Sorry Connection Problem"); $DB =mysql_select_db(DB_NAME,$CN) or die("Sorry Not Connect to Your Database"); if(isset($_POST['add'])) { $name=$_POST['name']; $link=$_POST['link']; $order=$_POST['order']; $description=$_POST['description']; $openwindow=$_POST['openwindow']; $sql="INSERT INTO wp_crud_links (`Name`, `Link`, `LinkOrder`, `Description`, `OpenWindow`) VALUES ('".$name."','".$link."','".$order."','".$description."','".$openwindow."')"; $res=mysql_query($sql); if($res) { echo "<script>document.location='admin.php?page=admin_linkesmenu&msg=1'</script>"; } else { echo "Error !"; } } if(isset($_POST['Update'])) { $uid=$_GET['id']; $name=$_POST['name']; $link=$_POST['link']; $order=$_POST['order']; $description=$_POST['description']; $openwindow=$_POST['openwindow']; $sql="update wp_crud_links set Name='".$name."' , Address='".address."' , Mobile='".$mobile."' , Fileupload='".$image_name."' where ID='".$uid."'"; $reg=mysql_query($sql); if($reg) { echo"<script>document.location='admin.php?page=admin_linkesmenu&msg=2'</script>"; } else { echo"Error !"; } } if($_GET['action'] == 'delete') { $did=$_GET['id']; $sql1="delete from wp_crud_links where ID='".$did."'"; $res1=mysql_query($sql1); if($res1) { echo"<script>document.location='admin.php?page=admin_linkesmenu&msg=3'</script>"; } else { echo "Error !"; } } ?> <?php if(isset($_GET['action']) && ($_GET['action'] == 'edit')) { $urid=$_GET['id']; $sql="select * from wp_crud_links where ID='".$urid."'"; $reg=mysql_query($sql); $res=mysql_fetch_array($reg); $uname= $res['Name']; $ulink= $res['Link']; $uorder= $res['LinkOrder']; $udescription= $res['Description']; $uopenwindow= $res['OpenWindow']; ?> <form name="add" action="" method="post"> <table cellpadding="5" cellspacing="5"> <tr> <td>Name :</td> <td><input type="text" name="name" value="<?php echo $uname; ?>" /></td></tr> </tr> <tr> <td>Link :</td> <td><input type="text" name="link" value="<?php echo $ulink; ?>" /></td></tr> </tr> <tr> <td>Order :</td> <td><input type="text" name="order" value="<?php echo $uorder; ?>" /></td></tr> </tr> <tr> <td>Description :</td> <td><textarea name="description" rows="3" cols="50"> <?php echo $udescription; ?></textarea></td></tr> </tr> <tr> <td>Open in new window :</td> <td><input type="checkbox" name="openwindow" value="<?php echo $uopenwindow; ?>" <?php echo ($uopenwindow == 1 ? 'checked' : '') ?> /></td></tr> </tr> <td><input type="submit" name="Update" value="update" align="middle"/> <a href="admin.php?page=admin_linkesmenu" style="text-decoration:none;"><input type="button" name="cancel" value="Cancel" id="html-upload" align="middle"></a> </td> </tr> </table> </form> <?php }elseif(isset($_GET['action']) && ($_GET['action'] == 'add')) { ?> <hr> <form name="add" action="" method="post"> <table cellpadding="5" cellspacing="5"> <tr> <td>Name :</td> <td><input type="text" name="name" /></td></tr> </tr> <tr> <td>Link :</td> <td><input type="text" name="link" /></td></tr> </tr> <tr> <td>Order :</td> <td><input type="text" name="order" /></td></tr> </tr> <tr> <td>Description :</td> <td><textarea name="description" rows="3" cols="50"></textarea></td></tr> </tr> <tr> <td>Open in new window :</td> <td><input type="checkbox" name="openwindow" value="1" /></td></tr> </tr> <tr> <td> <input type="submit" name="add" value="Add" align="middle"/> <a href="admin.php?page=admin_linkesmenu" style="text-decoration:none;"><input type="button" name="cancel" value="Cancel" id="html-upload" align="middle"></a> </td> </tr> </table> </form> <?php } else { ?> <?php if($_GET['msg'] == 1) { ?> <h2><center> Record Sucessfull Added</center></h2> <?php } ?> <?php if($_GET['msg'] == 2) { ?> <h2><center> Record Sucessfull Updated</center></h2> <?php } ?> <?php if ($_GET['mag'] == 3){?> <h2><center> Record Sucessfull Deleted</center></h2> <?php } ?> <div class="wrap" style="float:none;"> <h2>Simple CRUD Operation <a class="add-new-h2" href="admin.php?page=admin_linkesmenu&action=add">Add New</a></h2> </div> <table cellspacing="0" class="wp-list-table widefat fixed pages"> <thead> <tr> <th style="width:30px;" class="" id="" scope="col"><span>No</span></th> <th style="width:100px;" class="" id="" scope="col"><span>Name</span></th> <th style="width:100px;" class="" id="" scope="col"><span>Link</span></th> <th style="width:100px;" class="" id="" scope="col"><span>Order</span></th> <th style="width:200px;" class="" id="" scope="col"><span>Description</span></th> <th style="width:200px;" class="" id="" scope="col"><span>OpenWindow</span></th> <th style="width:200px;" class="" id="" scope="col"><span></span></th> </tr> </thead> <tbody id="the-list"> <?php $i = 1; $sqlg = "SELECT * FROM wp_crud_links "; //$resg = $wpdb->get_results($sqlg); //foreach ( $resg as $rowg ) $resg = mysql_query($sqlg); if($resg === FALSE) { die(mysql_error()); } while($rowg = mysql_fetch_array($resg)) { $FileUpload=$rowg['FileUpload']; $rid=$rowg['ID']; echo '<tr valign="top">'; echo '<td>'.$i.'</td>'; echo '<td>'.$rowg['Name'].'</td>'; echo '<td>'.$rowg['Link'].'</td>'; echo '<td>'.$rowg['LinkOrder'].'</td>'; echo '<td>'.$rowg['Description'].'</td>'; echo '<td><input type="checkbox" '.($rowg['OpenWindow'] == 1?'checked':'').'/></td>'; echo '<td><a href="admin.php?page=admin_linkesmenu&action=edit&id='.$rid.'" >Edit</a> || <a href="admin.php?page=admin_linkesmenu&action=delete&id='.$rid.'" onclick="javascript:return confirm(\'Are You Sure?\')">Delete</a></td>'; echo '</tr>'; $i++; } ?> </tbody> </table> <?php } ?>
- let’s create the front end to display the data from the DB
- public php in wp is done via shortcodes
- private function define_public_hooks() add new line
-
$this->loader->add_action( 'init', $plugin_public, 'register_shortcodes' );
- this will call register_shortcodes function in the public folder of the plugin
-
public function register_shortcodes() { add_shortcode( 'crud_links_operation', array( $this, 'shortcode_crud_links_operation' ) ); }
- this will call shortcode_crud_links_operation that will generate html to display in the shortcode
- after we create the shortcode we can insert it to a post or or page
- [crud_links_operation][/crud_links_operation] and go to wp post and she the html you inserted in the short code.
Useful plugins for wordpress based website

1. Login Related plugin
a. Social Login – Login by social
Social Login is a professionally developed and free WordPress (BuddyPress compatible) plugin that allows your visitors to comment, login and register with 25+ Social Networks like for example Facebook, Twitter, Google, LinkedIn, PayPal, LiveJournal, Instagram, Вконтакте and Yahoo.
b. Peter’s Login Redirect – Redirect after login
c. Custom Login – Make login page looks better
d. BAW Login/Logout menu – Login / Logout option menu
2. Menus related Plugins
Nav Menu Roles
Hide custom menu items based on user roles. PLEASE READ THE FAQ IF YOU ARE NOT SEEING THE SETTINGS.
3. UpdraftPlus – Backup/Restore
https://wordpress.org/plugins/updraftplus
UpdraftPlus simplifies backups (and restoration). Backup into the cloud (Amazon S3 (or compatible), Dropbox, Google Drive, Rackspace Cloud, DreamObjects, FTP, Microsoft OneDrive, SFTP, SCP, WebDAV, OpenStack Swift and email) and restore with a single click. Backups of files and database can have separate schedules.
4. SI CAPTCHA Anti-Spam – https://wordpress.org/plugins/si-captcha-for-wordpress
Adds CAPTCHA anti-spam methods to WordPress forms for comments, registration, lost password, login, or all. In order to post comments or register, users will have to type in the code shown on the image. This prevents spam from automated bots. Adds security. Works great with Akismet. Also is fully WP, WPMU, and BuddyPress compatible.
5. Share Buttons by AddToAny – https://wordpress.org/plugins/add-to-any
The WordPress sharing plugin to help people share, save, and email your posts and pages using any service, such as Facebook, Twitter, Pinterest, Google, Reddit, Tumblr, StumbleUpon, LinkedIn, and well over 100 more sharing and social bookmarking sites.
6. Google Analytics Dashboard for WP – https://wordpress.org/plugins/google-analytics-dashboard-for-wp
Using a widget, Google Analytics Dashboard for WP displays detailed analytics data and reports about: number of sessions, number of visitors (users), page views, bounce rates, organic searches, pages per visit directly on your WordPress Dashboard.
In addition, in-depth Page reports and in-depth Post reports allow further segmentation of your analytics data, providing performance details for each post or page from your website.
This plugin also inserts the latest version of the Google Analytics tracking code in every page of your site. The tracking code is fully customizable through options and hooks.
6. WP Support Plus – https://wordpress.org/plugins/wp-support-plus-responsive-ticket-system
This plugin adds to WordPress the features of a complete ticket system with 100% responsive and 100% Ajax functionality. This allows users to submit tickets to report problems or get support on whatever you want. Users can set the status, priority and category of each ticket.
7. Members – https://wordpress.org/plugins/members
Members is a plugin that extends your control over your blog. It’s a user, role, and content management plugin that was created to make WordPress a more powerful CMS.
The foundation of the plugin is its extensive role and capability management system. This is the backbone of all the current features and planned future features.
8. Restrict Content – https://wordpress.org/plugins/restrict-content
Restrict Content to registered users only. This is a simple plugin that will allow you to easily restrict complete posts / pages to logged in users only. Levels of restriction may also be set. For example, you can restrict content to only Administrators, Editors, Authors, and Subscribers.
Content restriction works both with shortcodes and drop-down menu of access levels for complete posts / pages.
Usage:
[restrict userlevel=”editor”] . . . your restricted content goes here . . . [/restrict]
[not_logged_in]This is only shown to non-logged-in users[/not_logged_in]
9. bbPress – https://wordpress.org/plugins/bbpress
Have you ever been frustrated with forum or bulletin board software that was slow, bloated and always got your server hacked? bbPress is focused on ease of integration, ease of use, web standards, and speed.
We’re keeping things as small and light as possible while still allowing for great add-on features through WordPress’s extensive plugin system. What does all that mean? bbPress is lean, mean, and ready to take on any job you throw at it.
Languages: Also available in Bahasa Indonesia, Català, English (Australia), Español, Français, and 11 other languages. 10. Advanced Custom Fields – https://wordpress.org/plugins/advanced-custom-fields
Advanced Custom Fields is the perfect solution for any wordpress website which needs more flexible data like other Content Management Systems.
- Visually create your Fields
- Select from multiple input types (text, textarea, wysiwyg, image, file, page link, post object, relationship, select, checkbox, radio buttons, date picker, true / false, repeater, flexible content, gallery and more to come!)
- Assign your fields to multiple edit pages (via custom location rules)
- Easily load data through a simple and friendly API
- Uses the native WordPress custom post type for ease of use and fast processing
- Uses the native WordPress metadata for ease of use and fast processing
11. AmoForms – https://wordpress.org/plugins/amoforms/
Create forms and manage submissions easily with a simple interface. Contact forms, subscription forms, or other forms for WordPress.
amoForms is the easiest way to build any form you need for your WordPress website. No more messing with code or worries about limitations. amoForms is an absolutely FREE solution to create any form you want, when you want with a simple drag and drop interface provided by the very powerful amoForms framework. This contact form builder will equally fit the needs of the beginners and experienced developers and designers.
12. PinPoint booking system – https://he.wordpress.org/plugins/booking-system/
This Plugin will help you to easily create a booking/reservation system into your WordPress website or blog.
This Plugin will help you to easily create a booking/reservation system into your WordPress website or blog. The Booking System will display a calendar for users to see availability and book dates and hours.
13. TablePress
TablePress allows you to easily create and manage beautiful tables. You can embed the tables into posts, pages, or text widgets with a simple Shortcode. Table data can be edited in a speadsheet-like interface, so no coding is necessary. Tables can contain any type of data, even formulas that will be evaluated. An additional JavaScript library adds features like sorting, pagination, filtering, and more for site visitors. Tables can be imported and exported from/to Excel, CSV, HTML, and JSON files.